Using Claude as a Software Development Partner
How we misused AI by treating it as a complete solution instead of a prototyping tool, and what we learned about better integrating AI into development.
TL;DR
Our experiment with AI-assisted development had mixed results, but this was due to how we used the tool, not the tool itself. Claude was great during the initial design phase, raising questions that improved our design. It also performed well in getting a mostly functional feature up and running. Where we fell short was in not framing what we were using Claude for, guided by best practices like incremental development and building composable pieces. These practices help improve both the quality and speed of production.
In this experiment, we used Claude to build the entire feature, with the assumption that we’d refine and productionise it later. This was our mistake and not how good software is written—or how AI should be used. If we had treated Claude as a prototyping tool to surface potential approaches, identify blind spots, and uncover risks, we could have benefited without misleading ourselves. We realised we misunderstood the tool’s role in our process.
What Were We Building
We were tasked with building a setup wizard to guide users through essential profile setup tasks. If a post-login check found pending tasks, the wizard prompted them to complete a combination of:
- Profile details.
- Legal agreements (privacy policy, terms & conditions).
- MFA setup (if required by their organisation).
Our Approach
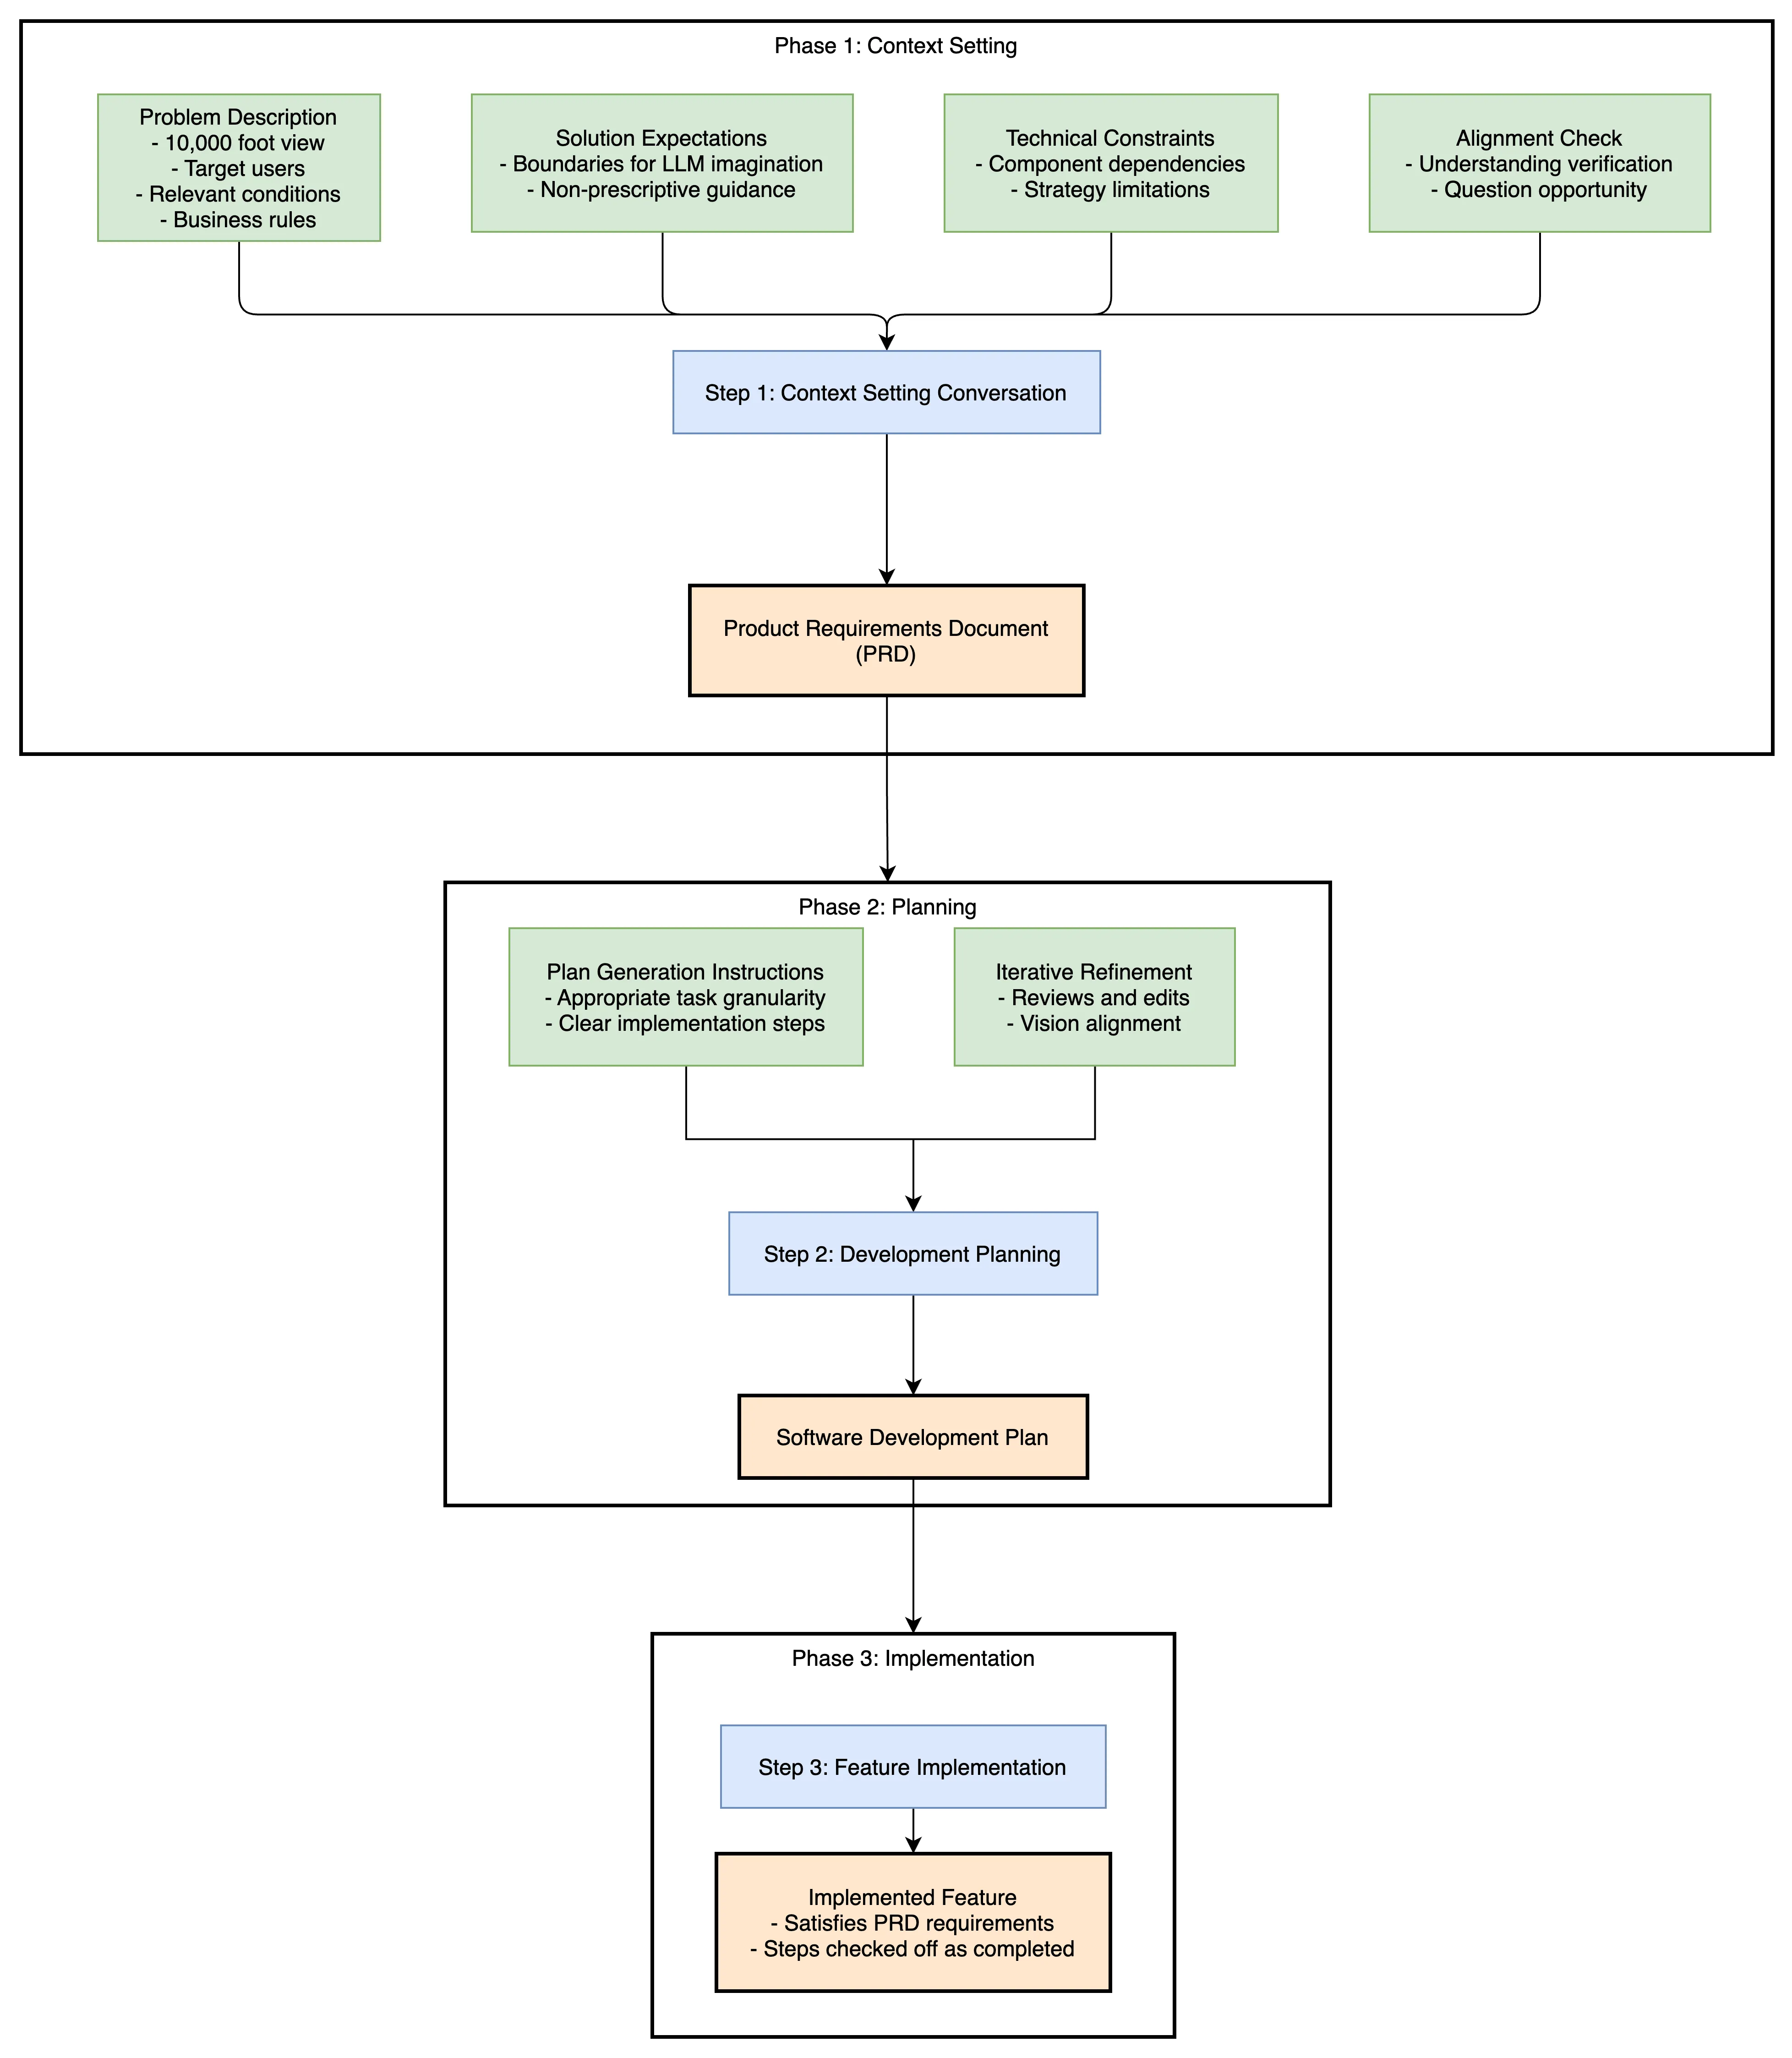
It is worth noting that all of this was done using Claude Sonnet 3.7 in agentic mode. We took the following approach:
-
Set context. Define the problem space for the LLM to generate a Product Requirements Document (PRD).
-
Create a detailed Software Development Plan (SDP) from the PRD.
-
Implement the feature gradually, step by step, following the SDP.
1. Defining the Problem Space, Setting Context
It is crucially important for have a conversation with the LLM to set context and expectations of the work-to-be-done.
Inputs:
- The problem we are trying to solve as described at the 10,000 foot level. Place emphasis on who the feature was for, the situations where it’s relevant, and any key business rules. Make sure there’s enough context so everyone has a shared understanding.
- A broad strokes explanation of the solution we expect. Importantly, we phrased this more so it would set boundaries on its imagination and not overly prescribe how it should solve for it.
- An explanation of the technical constraints that need to be considered. This largely took the form of highlighting dependencies between composing pieces.
- An explicit ask of the LLM whether it understood the problem space, and, if not, whether it had any questions it needed answered before it could.
What did this actually look like? This is our initial prompt to Claude. Note, this was sent as a single prompt. I have added breaks, --*--**--*--, to make the composing steps more obvious.
!! 👀 ESTABLISH THAT WE ARE HAVING A CONVERSATION TO SET CONTEXT
We are going a conversation so that we can build up a PRD for implementing a "User Set-up Wizard" feature in our codebase.
--*--**--*--
!! 👀 1. 10,000 FOOT LEVEL VIEW OF THE PROBLEM WE ARE SOLVINGThis is what we know so far:
This is problem we're trying to solve: after log-in, we need to prompt users to complete aspects of their profile that either need updating or completion.
Specifically, we currently have the following:1. terms of service2. privacy policy3. profile details
--*--**--*--
!! 2. 👀 BROAD STROKES EXPLANATION OF THE SOLUTION WE EXPECT
to achieve this- we want this to be on a route. we currently have the user settings on the /settings/user as defined in @router.tsx , and we want this to be a sibling of that- we are going to call a endpoint in the user-service which returns specifically which of these 4 things we need the user to do.- we have exist React functionality to update profile in a non-prompted through the user profile page @UserProfile.tsx), which we either want to re-use wholesale or match as closely as possible
--*--**--*--
!! 3. 👀 AN EXPLANATION OF TECHNICAL CONSTRAINTS
in the future, we expect to be adding other items such as updating your password or the setting up of MFA, so our approach needs to be extensible.
For the tech stack, in this codebase we generally try to use:- React- React Router- Tailwind CSS- React-aria-components (styled with Tailwind UI)- React Query- for now skip testing
--*--**--*--
!! 4. 👀 INITIATE DISCUSSION. DOES THE LLM HAVE ANY QUESTIONS?
What else do you need to know to produce a PRD with the fewest open questions?Outputs:
- In conclusion, a Product Requirement Document (PRD). However, to get there we expected to have to answer questions from the LLM. The whole point of this exercise was to gain alignment with the LLM, so that it may produce a PRD which we could then validate and use for development. There was a lot of back and forth, the LLM asking questions and us clarifying them.
2. Creating a Plan of Implementation
Have the LLM generate a plan for how it will achieve the work outlined in the PRD.
Inputs:
- The PRD produced from step 1.
- An instruction to generate an implementation plan. We focused on making sure we produced a plan that was refined enough that once we came to implementation, and the LLM using it as its roadmap, that the composing tasks, the slices, it was stepping through were obvious enough and of appropriate enough granularity that the possibility of the LLM being confused was at a minimum.
- We reviewed the plan it generated and continuously asked it for edits and clarification. Again, what was important was to make sure that it was aligned with our vision of the work to be done.
What did this look like in practice?
using the @user-set-up-wizard-prd.md PRD, please write a fine-grained implementation plan for in @user-set-up-wizard-implementation-plan.md.Outputs:
- An implementation plan.
3. Implementation
Have the LLM implement the feature using the implementation plan as its roadmap. We made sure that as the LLM worked through this document, that it checked off the steps it had completed.
Inputs:
- The implementation plan produced from step 2.
What did this look like in practice?
we are working through this implementation plan bullet point by bullet point, striking through each task once it's completed. please implement the next taskOutputs:
- A fully fledged feature that satisfies that described in the PRD.
Reflections
Speed and Efficiency Tradeoffs
I’m not sure if it made us quicker. Normally, we’d spend the same time context-sharing in Miro with post-its, though maybe with less refinement. The advantage of using the LLM was that it produced a PRD, which helped guide implementation steps, making it a more useful artefact.
For implementation, the LLM works fast but also makes mistakes that require constant corrections. Some issues can be addressed with rules, but it’s unclear how effective that is. In the end, its output always needs revision and time spent revising could be time spent doing it yourself. I think there’s a balance to be struck for a better workflow—one that relies on intuition to know when the LLM is being unhelpful or veering off course. It’s like knowing when Tesla’s autopilot is careening into a ditch and when to grab the wheel. A crucial step is instructing the LLM on its mistakes and codifying rules to improve future responses.
Team Collaboration Challenges
We tasked the LLM with completing a full feature, and it could handle it. This meant only one person needed to validate and prompt it, while the team mainly collaborated during the PRD and development planning phases. Instead of just generating a rough starting point, we had it produce the entire feature. This raised a key question: where do we, as a team, pick up the work? How do we parallelise our efforts?
It seemed like we had to rethink our approach—starting from a functionally complete feature and dividing up the remaining productionisation tasks. However, as I’ll explain below, this approach is a fundamentally flawed method for building software.
Alternatively, we could have taken different steps in the implementation plan and had each of us use the LLM to build a slice of the feature privately. However, this approach is difficult to coordinate, and I believe the context built during one person’s session is crucial for the LLM to do a good job.
Software Development Principles: What We Sacrificed, Prototyping Versus Production
We got great feedback that, irrespective of the LLM, we took an approach that didn’t align with our usual way of working or best practices. Instead of breaking the work into small, shippable pieces, we went for a big bang, fully complete feature. That’s the opposite of how we normally work—where research and experience show that small, incremental progress leads to better results.
Skipping incremental progress in favour of a big reveal is a bad approach. It doesn’t make us faster—if anything, it makes productionising harder, lamer, messier, and more time-consuming because everything has to come together perfectly at once. Our brains aren’t wired to handle that kind of complexity, which is exactly why we do better when we break work into smaller, modular tasks and build up from there.
That doesn’t mean the approach was a waste. If we had treated it as an experiment or a prototyping phase rather than something we planned to ship, the LLM would have been really useful. But it’s crucial to keep that mindset from the start—the code isn’t meant to be polished or production-ready. It’s just a reference point for exploring ideas, testing solutions, and understanding how everything fits together. More importantly, it helps uncover risks and things we might have missed. The key is to treat this code as disposable.
I do see value in using LLMs during our initial mobbing sessions to build shared understanding before splitting off onto parallel work. They’re great for quickly prototyping ideas, spotting blind spots, and identifying risks early. But it’s crucial to keep these prototypes low fidelity. If we find ourselves nitpicking button styles, we’re treating the output as the final product instead of using it as a tool to make building the real thing easier.